In this video, We see how to extract speech text from video and save it in a file using Python. We use Python Packages and libraries that has trained by deep learning Speech Recognition models and has high accuracy. This is a Simple and Powerful code to Extract Speech from Video and do Speech Recognition on it.
Python Code of Video is :
import moviepy.editor as mp
import speech_recognition as sr

clip = mp.VideoFileClip("1.mp4")

clip.audio.write_audiofile("ExtractedAudio.wav")

r = sr.Recognizer()
audio = sr.AudioFile("ExtractedAudio.wav")

with audio as source:
    audio_file = r.record(source)

try :
    result = r.recognize_google(audio_data= audio_file)

    with open("result.txt", "w") as file :
        file.write(result)
        file.close()

    print("Runs Successfully")

except sr.UnknownValueError :
    print("Google Speech Recognition Engine Could not Understand Audio.")
except sr.RequestError as e:
    print("Could not Get response from Google, Error is {0}".format(e))
except Exception as e:
    print(e)

clip.close()
print("End")
Task Automation is an easy task on python. Probably the most common task we do every day is sending messages on WhatsApp. in this tutorial we want to Automate Sending whatsapp Message in Python. At first we need pywhatkit library. The pywhatkit library allows you to send individual Whatsapp messages, send messages to groups, and even send images – all from Python!. To install the last version of pywhatkit, open up a terminal and run the following command.
pip install pywhatkit
The sendwhatmsg_instantly() function will send a Whatsapp message after running the code, hence the “instantly” in the name. Two parameters are required:
phone_no – A phone number to which you want to send the message. Don’t forget to include the country code.
message – The actual message you want to send.
Let’s see it in action:
import pywhatkit

# syntax: phone number with country code, message
pywhatkit.sendwhatmsg_instantly(
    phone_no='<phone_number_with_country_code>',
    message="Howdy! This message is Send Automatically by Python. CodeTipsAcademy.com!",
)
after running code, you’ll land on a new chat screen with your message populated in the input area. For some reason, the message isn’t sent automatically, and you have to manually click on the send button. So, this is not good and we will fix it in future.
Send Schedule Whatsapp Messages
if you want to send Scheduled Whatsapp Message you should use sendwhatmsg() function. sendwhatmsg() has following input parameters.
phone_no – A phone number to which you want to send the message. Don’t forget to include the country code.
message – The actual message you want to send.
time_hour – Integer, represents the hour (24h format) in which you want to send the message.
time_min – Integer, represents the minute in which you want to send the message.
See an example of using sendwhatmsg() function. in code below we send a whatsapp message at 19:30.
import pywhatkit

# syntax: phone number with country code, message, hour and minutes
pywhatkit.sendwhatmsg('<phone_number_with_country_code>',
"Howdy! This message is Send Automatically by Python. CodeTipsAcademy.com!",
 19, 30)
As before, the message doesn’t get sent automatically, and you have to manually click on the Send button. this issue will be solved in future of this article, keep reading.
Send Whatsapp Image
To send Images and GIF’s to WhatsApp users sendwhats_image function must be used. For Linux based distributions you need copyq installed on your system. Windows users can send Images (all formats) and GIF’s. For Linux based distributions, only JPEG and PNG are supported. For MacOS users, only JPEG is supported currently.
import pywhatkit

# syntax: phone number with country code, Image, caption
pywhatkit.sendwhats_image('<phone_number_with_country_code>',
"C:\\Image.png", "Here is the image", 10, True, 5)
As before, the message doesn’t get sent automatically, and you have to manually click on the Send button. this issue will be solved in next section, keep reading.
Solve Issue of needing to press send button
We need 2 additional Python libraries to automatically trigger the Send button. These are pyautogui and pynput. so, cammand below download these packages.
pip install pyautogui pynput
The send_whatsapp_message() function does the following:
Opens Whatsapp Web and populates the input field with the specified message.
Sleeps for 20 seconds to ensure everything has loaded properly.
Clicks on the screen to ensure the correct window/tab is selected.
Presses and releases the Enter key on the keyboard to send the message.
If any of the steps fail, the exception is printed to the console.
Here’s the entire code snippet for the function with a usage example:
import time
import pywhatkit
import pyautogui
from pynput.keyboard import Key, Controller

keyboard = Controller()

def send_whatsapp_message(msg: str):
    try:
        pywhatkit.sendwhatmsg_instantly(
            phone_no='<phone_number_with_country_code>',
            message=msg,
            tab_close=True
        )
        time.sleep(20)
        pyautogui.click()
        time.sleep(2)
        keyboard.press(Key.enter)
        keyboard.release(Key.enter)
        print("Message sent!")
    except Exception as e:
        print(str(e))


if __name__ == "__main__":
    send_whatsapp_message(msg="Test message from a Python script!")
Corners and Edges of an Image yield an interesting features of the image content that can be used in image retrieval and object detection or scene recognition tasks. So, they be called “Local invariant features“.
In this context we want to explain Moravec Corner Detection Method Which is a simple corner detection method and we write It ‘s Python Code. This method proposed by Hans Moravec who is an adjunct faculty member at the Robotics Institute of Carnegie Mellon University.
Hans Moravec (source: Carnegie Mellon University website)
The key idea behind the concept is simple, first look at 4 boxes in image below (Image 1). In box 1 (Left box) you see a black box with a blue window on it, that contains some data of black box in it, suppose this black box is an Image, if you move this blue window horizontally or vertically, data in the window won’t change, so, this is a flat surface. In the 2nd box, if you move the blue window vertically, content of the blue window won’t change. but, if move window in horizontal direction, content of the blue window will change (white pixels will be more or less), so, It means that a vertical edge is in the blue window. In 3rd box, only moving vertically will change the data in the blue window, that means a horizontal edge is here. But, in 4th image moving horizontally and vertically will change the data in the blue window, so, in 4th image content of the blue window is a corner.
Image 1 : Image Edge and Corner
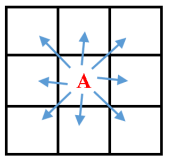
As you see here, Moravec method is a very simple method; however, It is useful, too. In the moravec paper we only move the blue window horizontally or vertically. though, others extend this method to move blue window in all directions for example if blue window is 3×3 box, the blue window can move in 8 directions.(Image below)
Image 2: Pixel Direction with a window
In a nutshell :
So, to find all corners in an image first we should find grayscale of the image, then we find the difference of intensity between each box and it’s 8 close boxes.
To find the difference 3 main methods in machine learning usually used. Those are:
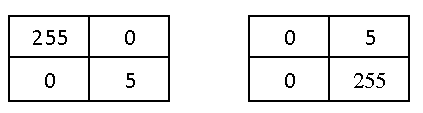
Subtract of values: That is not suitable for us, for instance, in 2 images with matrix below The intensity differences for pixels is 0 that can be confuse us to say that there is no change.
Absolute value of differences. This is not suitable for optimization problems because this is not Differentiable.
Square of the Difference (SD). This method does not have issues above so It is a useful method to calculate intensity differences. Mathematical definition of this method is below. shows x and y position of 2 close pixels and is Intensity of pixel in
Now, we know how moravec method works, but in real world senarios pixels are in 3 channels (Red, Green, Blue) and many of the pixels has Sqaure of Differences bigger than 0 in all directions but all the time these pixels with are not Corner. Therefore, the practical method is to Compute Sum of Square of the Differences (SSD) and suppose a thereshold, if then, It shows a corner.
in this formula and must have values to cover 8 pixel around the pixel that we want to see if it is a corner(Pixel A in Image below), so and is a member of set to cover all the 8 pixels around A.
There are many method to find a suitable threshold, Usually Machine Leaning method works good.
Now it’s time to see the Python code of the more of it corner detection method.
Disadvantages if Moravec method:
Scale Invariant
Strong response to edge points (can be sensitive to noise)
Finding a good size for moving window is Experimental.
Moravec corner detector only concerns eight principle directions which will have a poor repeatability rate.
from PIL import Image
from matplotlib import cm
import matplotlib.pyplot as plt
import numpy as np
import cv2
from tqdm import tqdm

I_org = cv2.imread(r"Images/pexels-mak-jp-11504568.jpg")
I = cv2.cvtColor(I_org,cv2.COLOR_RGB2GRAY)

numRows, numCols = I.shape[0], I.shape[1]    #h,w
directions = {
    'left':(0,-1),
    'right':(0,1),
    'up':(-1,0),
    'down':(1,0),
    'up_left':(-1,-1),
    'up_right':(-1,1),
    'down_left':(1,-1),
    'down_right':(1,1),
}

C = np.zeros(I.shape)
for i in tqdm(range(2,numRows-2)) :
    for j in range(2,numCols-2) :
        minSSD = -1
        for d in directions.values():
            u, v = d[0], d[1]
            P1 = I[i-1:i+2, j-1:j+2]
            P2 = I[i+u-1:i+u+2, j+v-1:j+v+2]
            ssd = np.sum((P1 - P2)**2)

            if minSSD == -1 :
                minSSD = ssd
            elif ssd < minSSD :
                minSSD = ssd

        C[i,j] = minSSD

th = C.mean()+2*C.std()
C_image = C > th


I2 = I_org#[:,:,::-1]
idx = np.argwhere(C_image)
r,c = idx[:,0],idx[:,1]
for i in tqdm(range(len(r))):
    I2 = cv2.circle(I2,(c[i],r[i]), radius=1,color=(0,0,255),thickness=-3)

cv2.imshow("Result Image", I2)
cv2.imwrite("Result.jpg", I2)
cv2.waitKey()
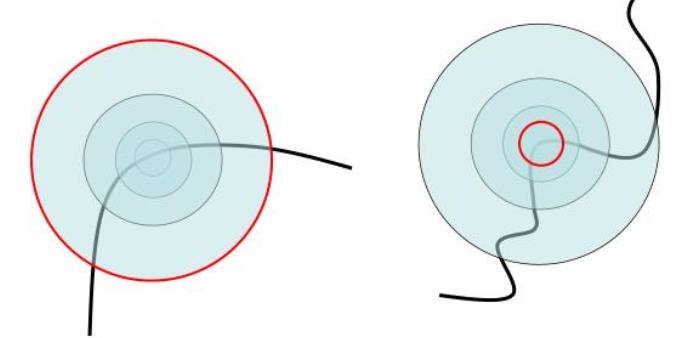
to describe the problem of scale invariant of moravec algorithm, see image below, It can be seen that a corner can be detected as edge in a different scale.


 window

 shows x and y position of 2 close pixels and
  is Intensity of pixel in

 in all directions but all the time these pixels with
  are not Corner. Therefore, the practical method is to Compute Sum of Square of the Differences (SSD) and suppose a
  then, It shows a corner.
 and
and  must have values to cover 8 pixel around the pixel that we want to see if it is a corner(Pixel A in Image below), so
  to cover all the 8 pixels around A.